User Manual — Version 3.100
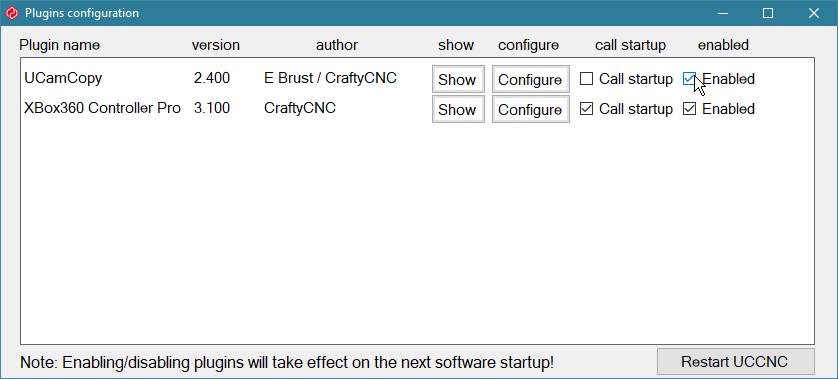
XBox 360 Controller Pro is a plugin for the UCCNC machine-control software. It turns a wired or wireless-receiver XBox 360 controller into a hand-held pendant:
XBoxcontrollerPro.dll into the plugins folder of your UCCNC installation
(for example C:\UCCNC\plugins\). Also copy the XBoxControllerPro folder into plugins; it holds
this manual, which the Help tab opens.
When there are no saved settings, the plugin also asks whether you work in inch or metric and loads matching starting values: left stick on X and Y, right stick on Z with its X movement picking the jog step (a trigger must be held), cubed stick response, the D-pad step-jogging X and Y, the shoulder buttons step-jogging Z, Start toggling the mapping overlay, and the plugin starting in pendant mode. Jogging itself stays off until you enable it. You can instead choose a settings file, or skip and start from blank controls. Starting values you saved with Save as defaults are used without asking.
On first run the plugin creates its settings folder, plugins\XBoxControllerPro\Settings\, and a 45-day
demonstration period starts (see section 15).
Replace XBoxcontrollerPro.dll in the plugins folder with the new one, and leave your old
xboxcontroller.xml and xboxcontroller_PROFILENAME.xml settings files where they are, in the
plugins folder. The first time version 3.100 runs it reads them; it never changes them. It then saves your settings in the new
location (plugins\XBoxControllerPro\Settings\), one file per UCCNC profile. Controls that no longer exist in this version are
skipped. Check your settings once and press Save Settings.
Also copy the XBoxControllerPro folder that comes with the plugin into the plugins folder. It holds this manual
(XBoxControllerPro\Manual\), which the Open the manual button on the Help tab opens.
If you are coming from version 2, also delete the old xboxcontroller.dll from the plugins folder so UCCNC does
not list both plugins.
The plugin window can be hidden to the notification area (system tray). Right-click the tray icon and choose Show Plugin to bring it back, or double-click the icon to enable or disable jogging. You can also assign a UCCNC button number that opens the plugin — see section 13.
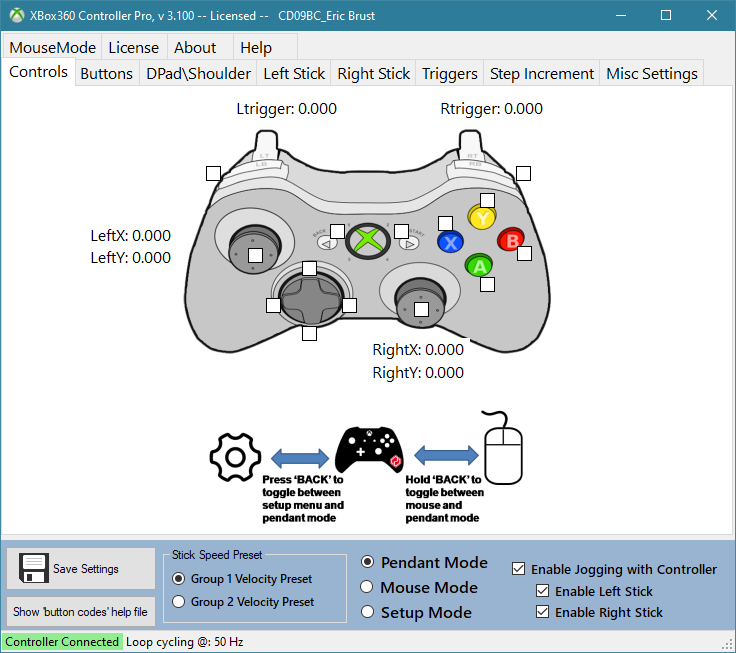
The window is a row of tabs along the top, a mode selector and a stick speed preset at the bottom, and a status bar.
| Tab | What it is for |
|---|---|
| Controls | Live view of the controller: indicator lights for every button, the main enable switches, and the stick and trigger values. Use this tab to check that the controller is being read. |
| Buttons | UCCNC button functions for A, B, X, Y, Start and the two stick clicks (section 8). |
| DPad\Shoulder | Step-jog axes or custom functions for the D-pad and shoulder buttons (section 9). |
| Left Stick, Right Stick | Axis assignment, deadband, velocity rate and maximum velocities for each stick (section 5). |
| Triggers | Trigger behavior and the jog safety (section 6). |
| Step Increment | Custom jog step sizes (section 7). |
| Misc Settings | Startup behavior, polling rate, info messages, settings files, and the button mapping overlay and setup menu (section 13). |
| Status Bar | The thin status bar along a screen edge: where it sits, how it looks, and what it shows (section 3.6). |
| MouseMode | Pointer and scroll speed (section 12). |
| License | Demo status and license key (section 15). |
| About, Help | Version information and the update check; the Help tab opens this manual (section 3.5). |
On the Controls tab, the main Enable Jogging with Controller switch and the Enable Left Stick and Enable Right Stick switches decide whether stick and button functions are sent to UCCNC. The round indicator for each button lights green while that button is pressed. The indicators are display only: they light even when jogging is disabled, so you can confirm the controller is being read without moving the machine.
The mode selector shows the current mode — Pendant, Setup or Mouse — and can be used to change it with the mouse. On the controller, the Back button changes mode (section 4).
Two sets of stick maximum velocities (Group 1 and Group 2) are defined on the Left Stick and Right Stick tabs. The Stick Speed Preset box (Group 1 Velocity Preset or Group 2 Velocity Preset) selects which group is active. The same choice is available from the setup menu.
The status bar shows whether the controller is connected and how fast the plugin’s control loop is running, for example Loop cycling @: 25 Hz. Hover the mouse over the rate to see how long each pass of the loop takes. The rate depends on the Polling rate setting (section 13.1). If the bar shows “Loop Fault” or “Error Updating Control Values”, see Troubleshooting.
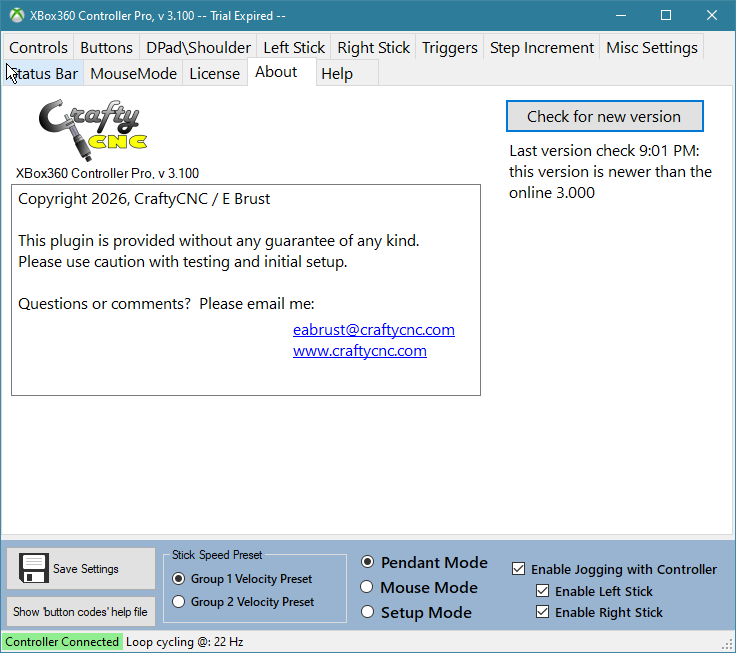
The About tab shows the plugin version and contact details. Its Check for new version button looks online for a newer release and tells you the result; a line under the button shows when the last check ran and what it found. The plugin also checks by itself each time it starts, in the background, and only speaks up if a newer version is available (turn this off with Check for new version on startup on the Misc Settings tab). If the check cannot reach the internet it says so and carries on.
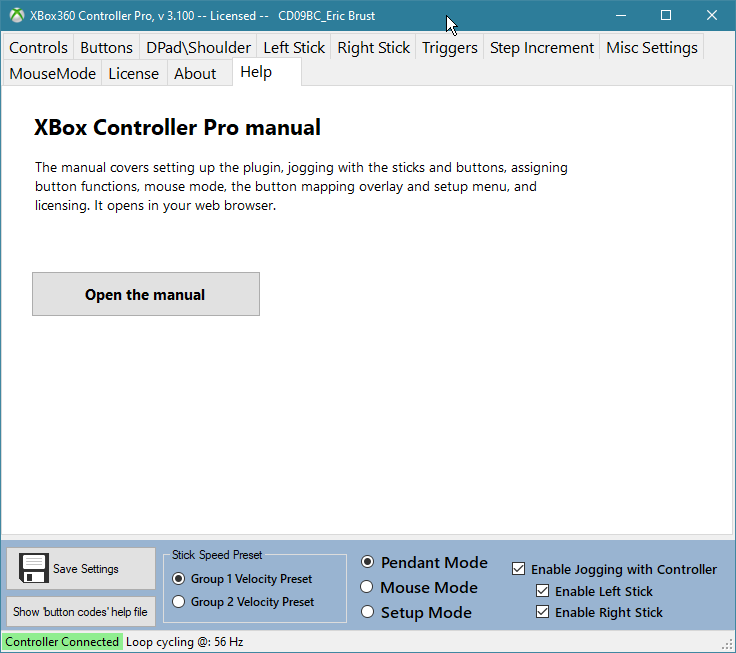
The Help tab has one button, Open the manual, which opens this manual in your web browser. The manual is installed
with the plugin in plugins\XBoxControllerPro\Manual\.
The status bar is a thin bar along one edge of the screen that shows the plugin’s state at a glance, so you can see it from across the machine without opening the plugin window. It sits in front of UCCNC, and in front of the Windows taskbar, without taking the keyboard focus from UCCNC. It is switched off until you tick Show the status bar on the Status Bar tab. It appears on the main (primary) monitor.

From left to right it can show:
| Item | Shows |
|---|---|
| XBoxControllerPro | The plugin name, so it is clear what the bar belongs to. |
| E-STOP / RESET | A flashing red chip while UCCNC’s emergency stop input is active, or the machine is in reset. |
| PENDANT / MOUSE / SETUP | The current mode. The whole bar is also coloured by mode: green for pendant, blue for mouse, amber for setup. |
| Step | The jog step size currently selected, for example Step: .010. |
| Speed set | The stick speed set in use, with the top speed of each axis the sticks drive, for example Speed set: 1 (X 1200, Y 1200, Z 600 unit/min). |
| Sticks | Sticks: ON, OFF (amber), LEFT ONLY or RIGHT ONLY. |
| Pad | Pad connected, or an amber NO PAD — or NO XINPUT PAD when Windows can see a gamepad that is not in XInput mode (see Troubleshooting). |
| ACTIONS BLOCKED | An amber chip while the button mapping overlay is blocking the controller (section 10.5). |
| HOLD | The long-press hold timer, described below. |
When you press and hold a button that has a function assigned to its long press, the bar turns into a countdown that tells you what you are about to do:
HOLD 1.4 > ZeroX (100). A lighter fill sweeps along the bar as the hold time runs out. When the long press has been reached the bar turns green and reads
RELEASE > ZeroX (100): let go and that function runs. Let go before then and it does not. A button with nothing assigned to its long press gets no countdown. The
countdown replaces the big countdown banner while the status bar is showing; with the bar hidden, or the hold timer item switched off, the banner is used instead (and it
names the function too).
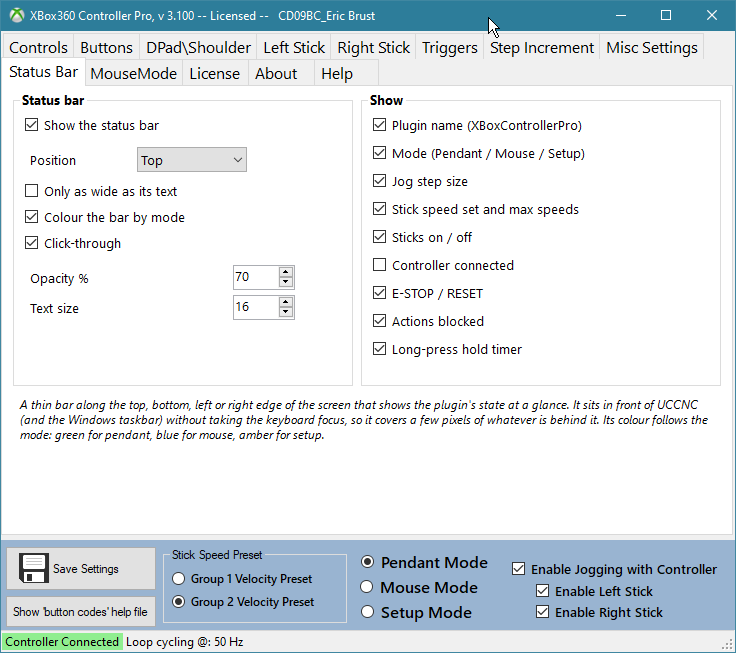
The tab has two groups. Status bar: Show the status bar; Position (top, bottom, left or right edge — left and right give a narrow vertical bar with the text turned to run along it); Only as wide as its text (otherwise the bar spans the whole edge); Colour the bar by mode; Click-through (the bar ignores the mouse, so whatever is behind it can still be clicked); Opacity; and Text size (the bar’s thickness follows it). Show: a tick for each item above, so the bar can be trimmed to just what you want.
The plugin has three modes. The Back button moves between them:
| Mode | What the controller does |
|---|---|
| Pendant mode | Normal operation. Sticks jog, buttons run the UCCNC functions you assigned. |
| Setup mode | Shows the quick-pick setup menu (section 11). Jogging and your button assignments are switched off while the menu is open. |
| Mouse mode | The controller moves the mouse pointer and sends keys (section 12). Jogging and your button assignments are switched off. |
| Press | From pendant mode | From setup mode | From mouse mode |
|---|---|---|---|
| Short press Back | Opens the setup menu | Closes the menu, back to pendant | No change |
| Long press Back (hold) | Switches to mouse mode | No change | Back to pendant mode |
A message on the screen confirms each change (“Setup Mode On”, “Mouse Mode On”, “Pendant Mode On”). When you return to pendant mode the enable switches are put back the way you had them. A long press is a hold of at least the hold time set on the Buttons tab; the controller vibrates once when the hold time is reached, and an optional countdown overlay shows the time remaining.
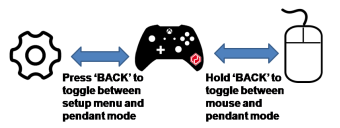
To always start in pendant mode, tick Startup in Pendant Mode on the Misc Settings tab.
The left stick and right stick each jog two axes (horizontal and vertical movement). Each stick has its own tab with identical controls.
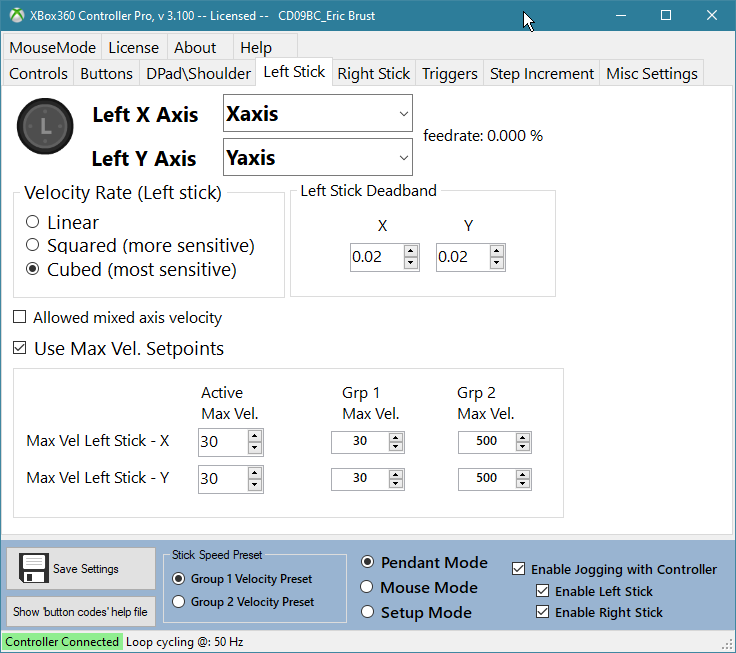
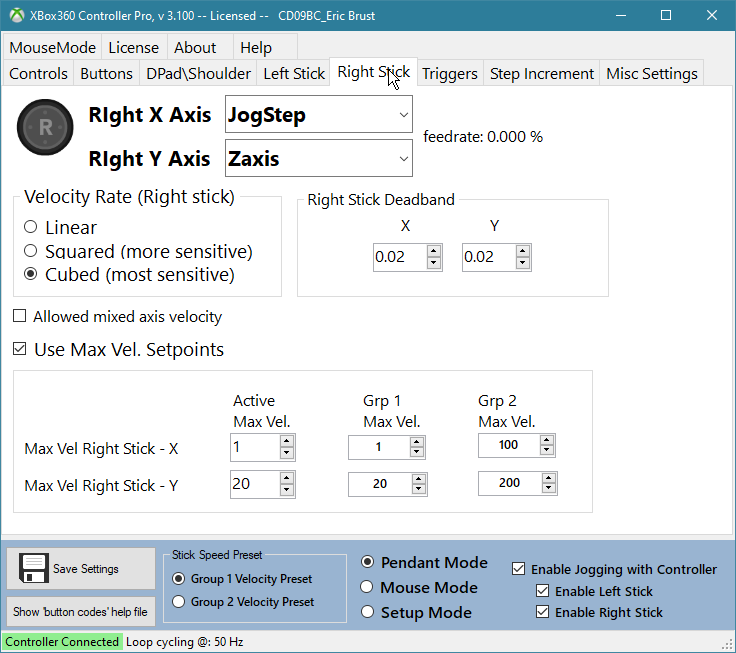
Each direction of each stick has an axis pulldown: Xaxis to Caxis (X, Y, Z, A, B, C). Choose a
Rev_ axis (for example Rev_Zaxis) to jog the opposite way. The right stick’s horizontal movement
can instead be used as the jog step selector (section 7).
By default a stick jogs one axis at a time — whichever direction is pushed further. Tick Allowed mixed axis velocity to allow both axes of a stick to move at once (combined diagonal movement, each axis at its own speed).
The deadband is the part of the stick’s travel around center that is ignored, as a fraction of full travel (0.02 = 2%). Raise it if an axis creeps when you let go of the stick. Speed ramps up from the edge of the deadband, so there is no jump when the stick leaves it.
The velocity rate decides how stick position becomes speed:
| Rate | Behavior |
|---|---|
| Linear | Speed rises in direct proportion to how far the stick is pushed. |
| Squared | Speed rises with the square of the deflection: finer control near center, while full deflection still reaches full speed. |
| Cubed | Speed rises with the cube of the deflection: the finest control at low speeds, while full deflection still reaches full speed. |
By default full stick deflection gives 100% of the axis velocity set in UCCNC. Tick Use Max Vel. Setpoints to set your own limit in units per minute for each stick direction:
0 gives a range of 0 to 100% of the axis velocity.The plugin never commands an axis above 100% of its UCCNC velocity.
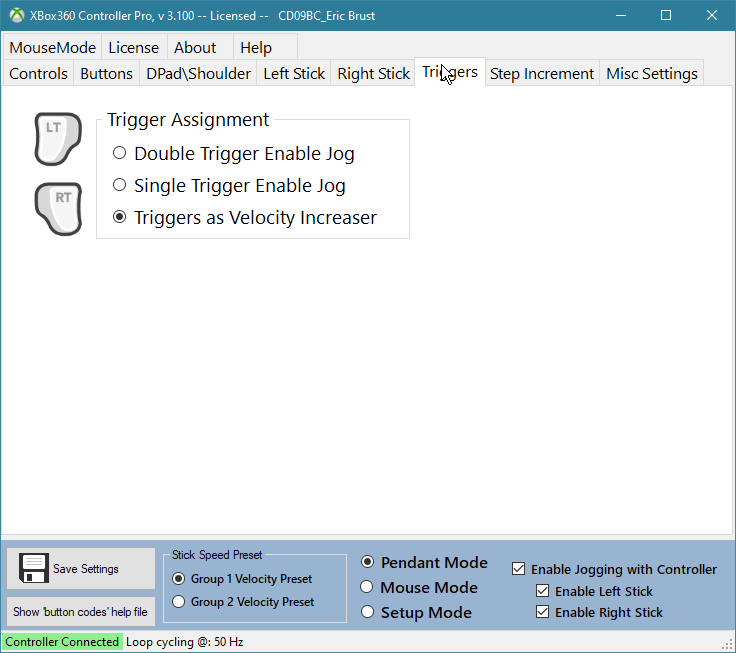
The Triggers tab decides what the two triggers do. Choose one option:
| Option | Behavior |
|---|---|
| Double Trigger Enable Jog | Both triggers must be held at the same time to allow jogging with either stick. Releasing either trigger stops jogging. |
| Single Trigger Enable Jog | Either one trigger must be held to allow jogging with either stick. |
| Triggers as Velocity Increaser | No safety lockout. The left trigger acts as a 1–2× speed multiplier for the left stick and the right trigger as a 1–2× multiplier for the right stick. With the trigger released the stick reaches up to 50% of the set maximum speed; pulling the trigger raises that toward 100%. |
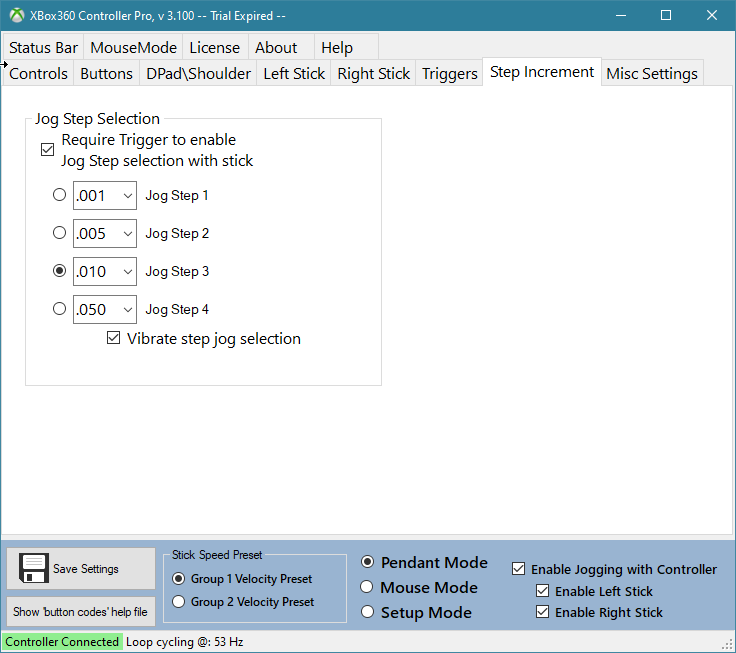
If you assign the right stick’s horizontal movement to JogStep (instead of an axis), moving the stick left or right and releasing it selects one of four step sizes:
| Stick movement, then release | Step | Default size |
|---|---|---|
| Full left | Step 1 | .001 |
| Half left | Step 2 | .010 |
| Half right | Step 3 | .100 |
| Full right | Step 4 | 1.000 |
Two options on the Step Increment tab refine this: Require Trigger to enable Jog Step selection with stick (a trigger must be held to change the step) and Vibrate step jog selection (the controller buzzes the step number: one buzz for step 1 up to four for step 4). The step you choose is also shown in the status bar (section 3.6) and in the setup menu. While the stick is mostly sideways, picking a step, the right stick’s vertical axis stays still unless Allowed mixed axis velocity is ticked.
On the Step Increment tab, enter your own size for any of the four positions. Leave a box blank to keep UCCNC’s default.
For example, entering .020 in Jog step 2 replaces the default .010. Choose which step is active with the step
radio buttons on this tab or from the setup menu.
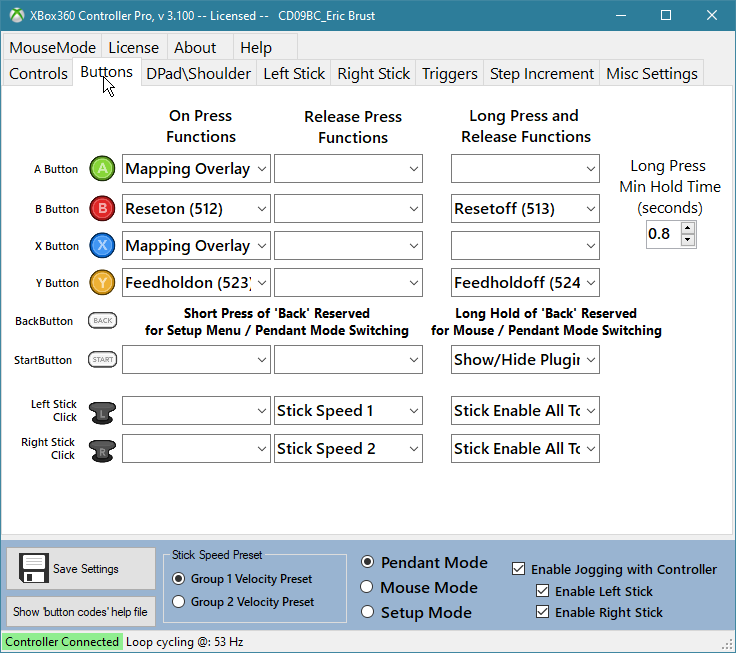
The Buttons tab lists A, B, X, Y, Start, the left-stick click and the right-stick click. Each has three boxes:
| Column | When it runs |
|---|---|
| On Press Functions | The instant the button goes down. |
| Release Press Functions | The instant the button is released after a short press (shorter than the hold time). |
| Long Press and Release Functions | When the button is released after being held at least the hold time. |
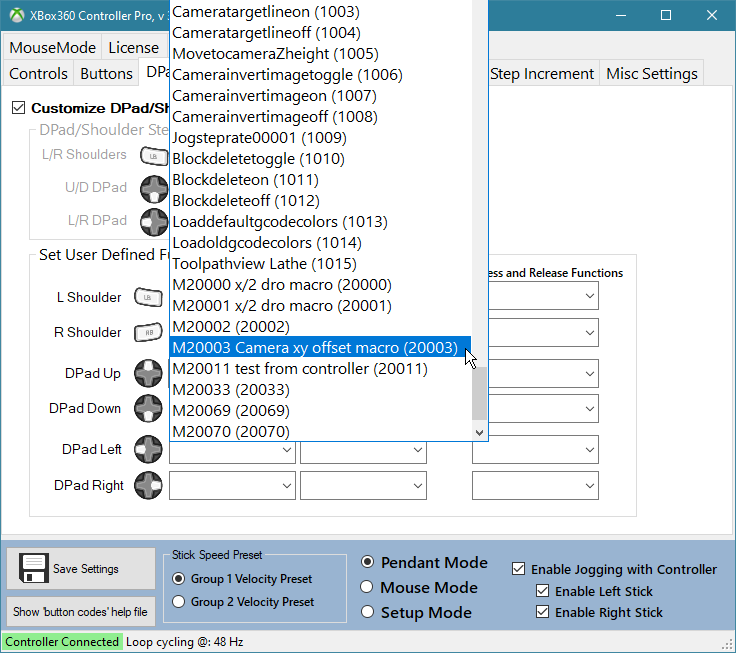
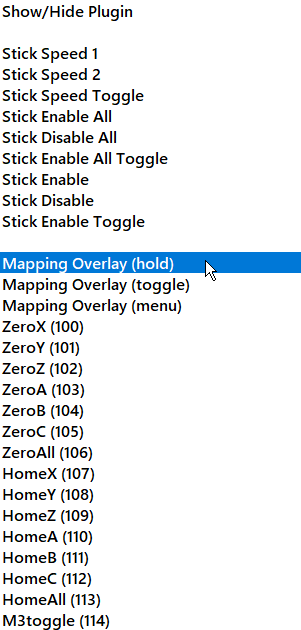
Each box is a pulldown of UCCNC’s button functions, shown by name with the button number in brackets — for example
ZeroX (100) or HomeZ (109). Click the arrow to scroll the list (it is in button-number order), or click in the
box and start typing a function name; the list completes it for you. Hover over a box to see what the chosen function does. The
functions that appear come from your own UCCNC installation (Documentation\Buttons_by_number.htm), so the list always matches
your UCCNC version; if that file cannot be found, the plugin uses a built-in list.
You can still type a plain button number (such as 100) — it is shown as its function name when you leave the box,
and older settings files that hold plain numbers load as before. A number that is not in the list is kept as typed. Press Show 'button codes' help file to open the full UCCNC list with descriptions. The function runs
only in pendant mode and only while the Enable switch is on.
Your own macros. At the end of each list the plugin adds the user macros from your current UCCNC profile: every
M20000–M21999 macro file in that profile’s macro folder (Profiles\Macro_<profile name>), shown as
M20003 Camera xy offset macro (20003). The text after the macro number is the first comment line of the macro file, so a short
comment at the top of each macro makes the list much easier to use; a macro with no comment shows only its number. Choosing one runs that
macro (UCCNC runs macro Mn when button n is pressed). Macros are read when the plugin window opens, so after adding or
renaming a macro file, close and reopen the plugin window. Copies such as M20202 - Copy.txt are ignored.
The hold time (in seconds) is how long a button must be held to count as a long press. When it is reached the controller vibrates briefly. Tick Visual Indicate Long Press on the Misc Settings tab to also show a countdown while the button is held, together with the function the long press will run. The countdown and the buzz only happen for a button that has a function assigned to its Long Press and Release box, so a button with nothing there stays quiet. With the status bar showing, the countdown appears on the bar instead of as a banner (section 3.6).
Besides button numbers, the Start button boxes accept Show/Hide Plugin, which minimizes or restores the plugin
window. Start works in every mode, so you can always bring the window back.
Pressing a stick in is a button. As well as a button number, the stick-click boxes offer these commands in their pulldown:
| Command | Effect |
|---|---|
| Stick Speed 1, Stick Speed 2, Stick Speed Toggle | Select stick velocity Group 1, Group 2, or switch between them. |
| Stick Enable All, Stick Disable All, Stick Enable All Toggle | Switch both sticks (and the main enable) on, off, or toggle them. |
| Stick Enable, Stick Disable, Stick Enable Toggle | Switch only the stick that was clicked on, off, or toggle it. |
A message on the screen confirms each change. These commands work in pendant mode.
With the stick commands at the top of every function pulldown (on the Buttons tab and, with Customize on, the DPad\Shoulder tab) are three entries that show the button mapping overlay (section 10):
| Entry | Use it in | Effect |
|---|---|---|
Mapping Overlay (hold) | the On Press box | The overlay is shown while you hold the button and hidden when you let go. |
Mapping Overlay (toggle) | any box | Shows the overlay if it is hidden, hides it if it is shown. |
Mapping Overlay (menu) | any box | Switches between the overlay and the setup menu (section 11). |
They work in pendant mode; in mouse and setup mode only the Start button’s boxes are active. Start is a good choice, because it works in every mode.
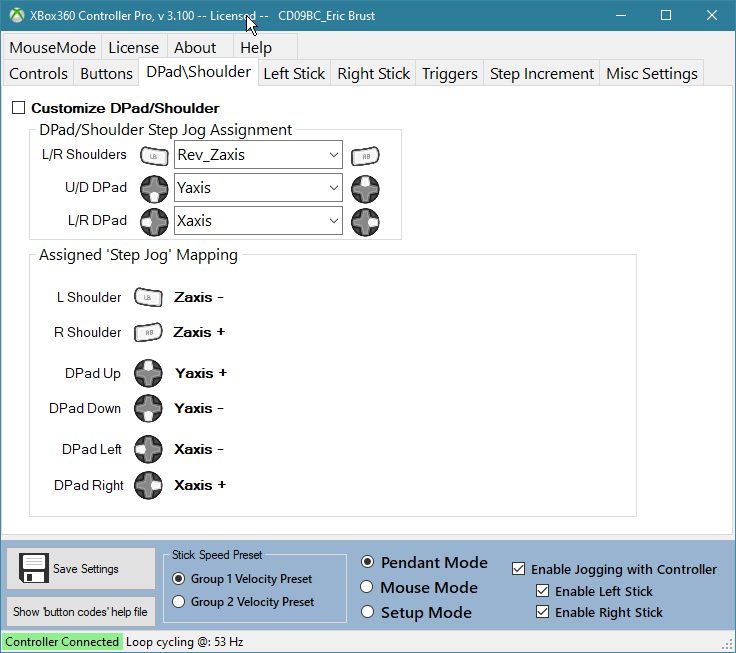
The D-pad (up, down, left, right) and the two shoulder buttons (LB, RB) can work in one of two ways, chosen by Customize DPad/Shoulder on the DPad\Shoulder tab.
Each pair of buttons step-jogs one axis. Pick the axis for the D-pad up/down pair, the D-pad left/right pair and the
shoulder pair. One button jogs the axis one direction, its partner the opposite direction; a Rev_ axis swaps
the two. One press moves one step of the active jog step size (section 7), and the plugin returns UCCNC
to step or continuous jogging mode afterwards, whichever it was in before.
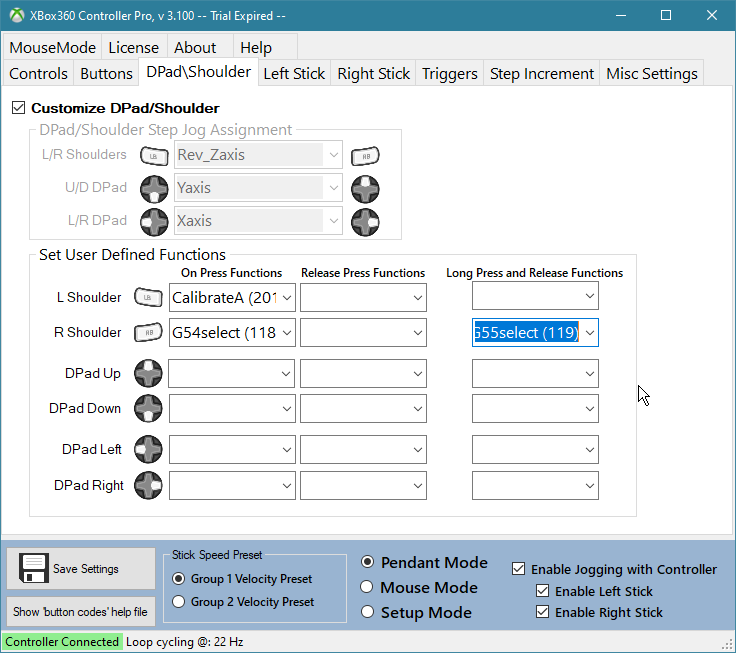
Each of the six buttons gets Press, Release and Long Press boxes, exactly like the buttons in section 8.
With many buttons, two sticks and three modes it is easy to forget what is assigned where. The button mapping overlay is a see-through panel, shown on top of UCCNC from the controller, that tells you what every stick and button does right now. It is built from your current settings each time, so it is always up to date, and it follows the current mode: it shows your assignments in pendant mode and the fixed controls in mouse mode and in the setup menu. The mode is named in the title bar.
The overlay never takes the keyboard focus away from UCCNC, and it stays in front of other windows.
Assign one of the Mapping Overlay entries (section 8.5) to a button:
Mapping Overlay (hold) in a button’s On Press box. The overlay is shown for as long as
you hold the button. This is the quickest way to take a look.Mapping Overlay (toggle) in any box. Each press shows or hides it. If you set
Auto-hide on the Misc Settings tab, a toggled-on overlay hides itself after that many seconds.To arrange it on the screen, press Show mapping on the Misc Settings tab. While it is shown that way you can drag it where you want it, and double-click it to close it. Its position is remembered.
The overlay has two looks, chosen with Mapping: diagram view on the Misc Settings tab (it can be changed while the overlay is showing). The list view groups the controls under headings: sticks, triggers, D-pad, shoulders, buttons, and Start and Back. The diagram view draws the controller with a callout for each stick, button and trigger, joined to it by a line.
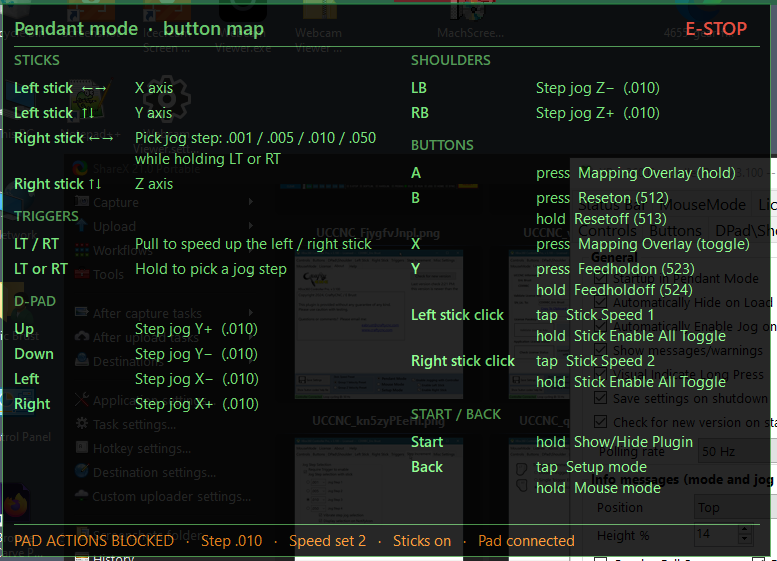
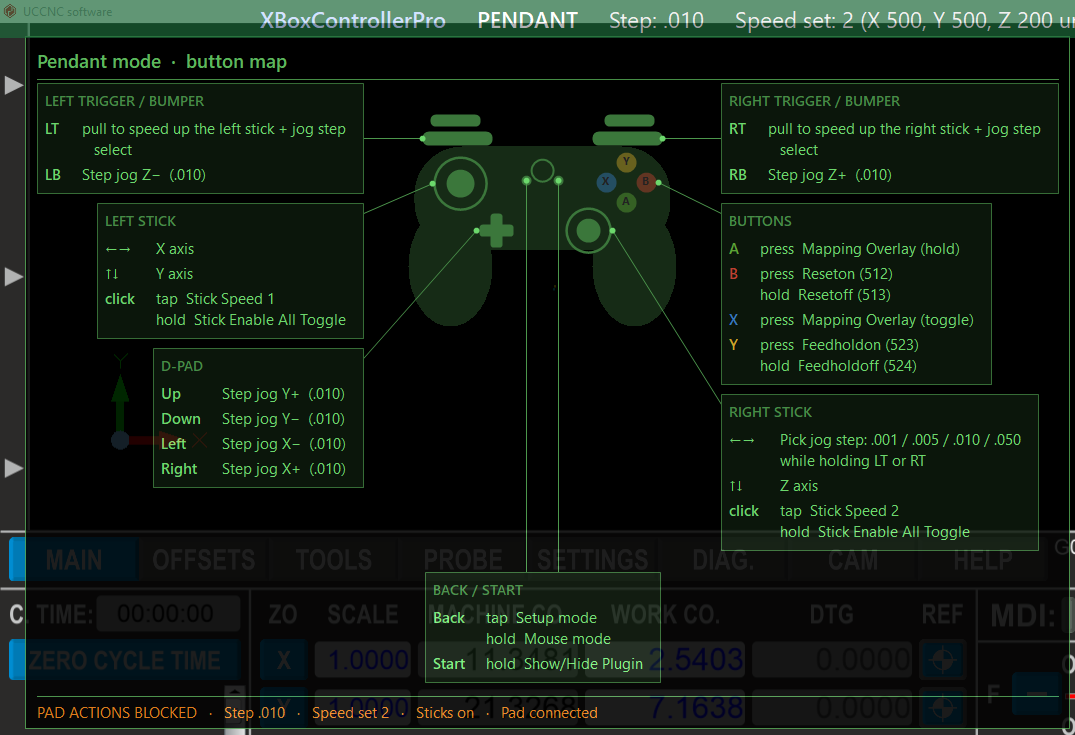
Rev_ axis and (stick off) if that
stick is switched off. A second line says what else has to be held: while holding LT + RT or while holding LT or RT when
a trigger safety is chosen (section 6), or when the right stick’s jog step selection needs a trigger
(section 7.1). The right stick shows the four jog step sizes when it is the step selector.In the diagram view the controls light up as you use them. A pressed button, D-pad direction, bumper or Start/Back turns orange; a trigger fills as far as you pull it; the stick knobs move with the sticks and light when clicked; and the callout for any control in use gets an orange border and line. It shows what the controller is doing whether or not the current mode acts on it, which makes it handy for checking that the controller is being read.
Normally the controller keeps working while the overlay is shown, so you can look at the map and carry on jogging. If you would rather press buttons to see what they do without doing it, tick Mapping: block actions. While the overlay is shown:
The status line turns orange to remind you that actions are blocked.
On the Misc Settings tab (section 13.4): Overlay opacity (20 to 100%, used for the overlay and the setup menu), Overlay text size (which also scales the controller drawing), click-through (the overlay ignores the mouse, so you can use UCCNC straight through it; untick it to be able to drag the overlay) and Auto-hide.
Short-press Back in pendant mode to open the setup menu. It is the button mapping overlay with a Quick settings panel beside it, so you can see what the controller does while you set it up. Like the overlay it never takes the keyboard focus from UCCNC. While the menu is open the controller works only the menu: your jog and button assignments, and the mouse and keyboard output, are off. (The Start button still runs the function assigned to it.)
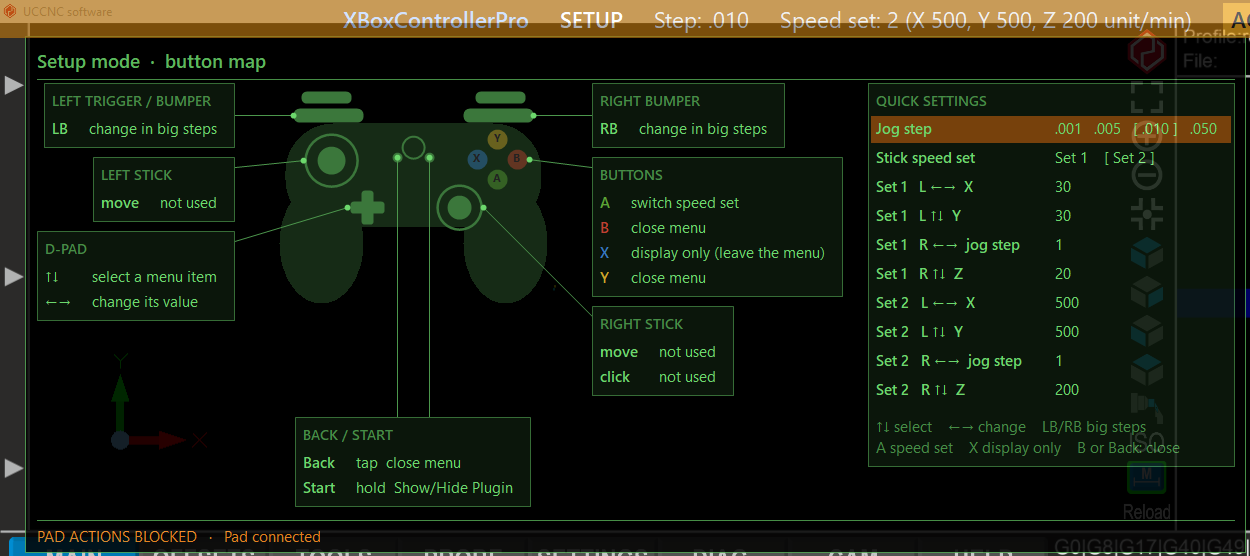
| Row | What it does |
|---|---|
| Jog step | Shows the four jog step sizes with the active one in brackets. Left and right pick another. |
| Stick speed set | Choose stick velocity Group 1 or Group 2 (section 5.5). Left chooses Set 1 and right chooses Set 2 (A switches to the other one); the chosen set becomes the one in use. |
| Set 1 and Set 2: the four stick directions | The maximum velocity of each stick direction in each group, labelled with the axis it drives. Left and right change the value. |
Everything you change takes effect straight away. Like the rest of the settings it is kept when you press Save Settings, or when the plugin closes if Save settings on shutdown is ticked.
A velocity changes by 1 for a tap, and by larger and larger amounts the longer you hold the D-pad, so you can make a fine adjustment or cover a wide range quickly. LB and RB change it ten times as fast. Editing a set changes the stick’s live maximum velocity only if that set is the one in use.
| Controller | Does |
|---|---|
| D-pad up / down | Move between rows |
| D-pad left / right | Change the row’s value (hold to repeat and speed up) |
| LB / RB | Change a velocity in big steps |
| A | Switch the stick speed set |
| X | Display only: leave the menu but keep the button mapping overlay on screen |
| B or Y | Close the menu and the overlay, back to pendant mode |
| Back (short press) | Same: close the menu and return to pendant mode |
You can change between the setup menu and the display-only overlay without closing the overlay. Press X in the menu to drop to
the display-only overlay (you return to pendant mode and the overlay stays up). To go from the display back into the menu, assign
Mapping Overlay (menu) (section 8.5) to a button and press it; pressed again in the menu, it returns to the
display. The panel needs no mouse or keyboard at any point.
The menu uses the same opacity as the overlay (Overlay opacity on the Misc Settings tab).
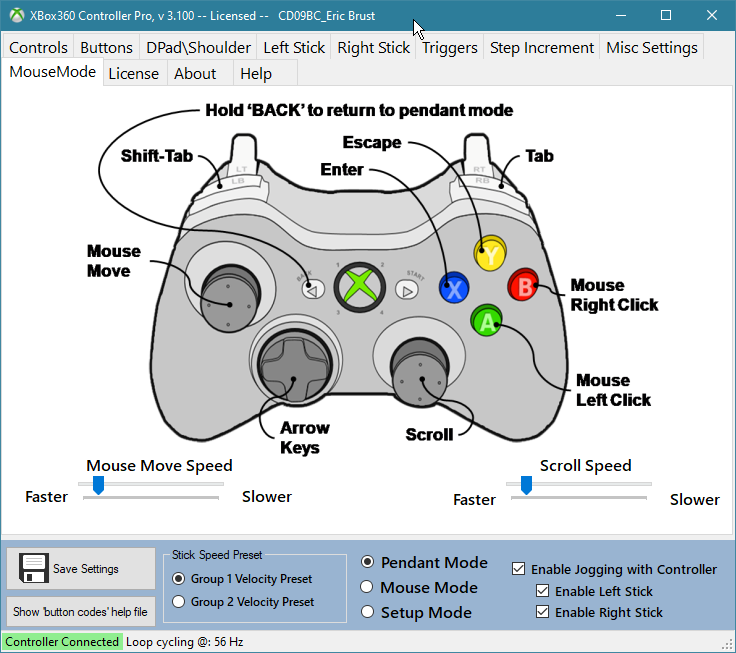
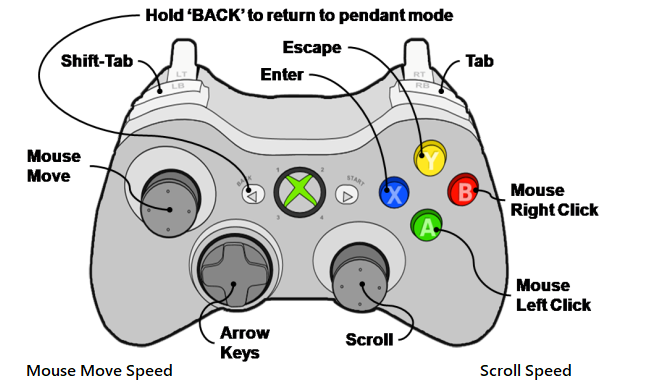
Hold Back in pendant mode to switch to mouse mode, and hold it again to return. Your jog and button assignments are switched off while in mouse mode.
| Controller | Mouse mode action |
|---|---|
| Left stick | Move the pointer. Pulling the left trigger moves it faster. |
| Right stick | Scroll wheel (vertical and horizontal) |
| A | Left mouse button |
| B | Right mouse button |
| X | Enter key |
| Y | Escape key |
| D-pad | Arrow keys |
| RB / LB | Tab / Shift+Tab |
| Right stick click | Space bar |
The MouseMode tab has two sliders: Mouse Move Speed and Scroll Speed (slide toward Faster for quicker
movement). While the button mapping overlay is shown with Mapping: block actions ticked, the pointer, clicks and keys are held
(section 10.5). Press-and-hold the button you assigned to Mapping Overlay (hold), or use the toggle entry, to see
this map on the screen.
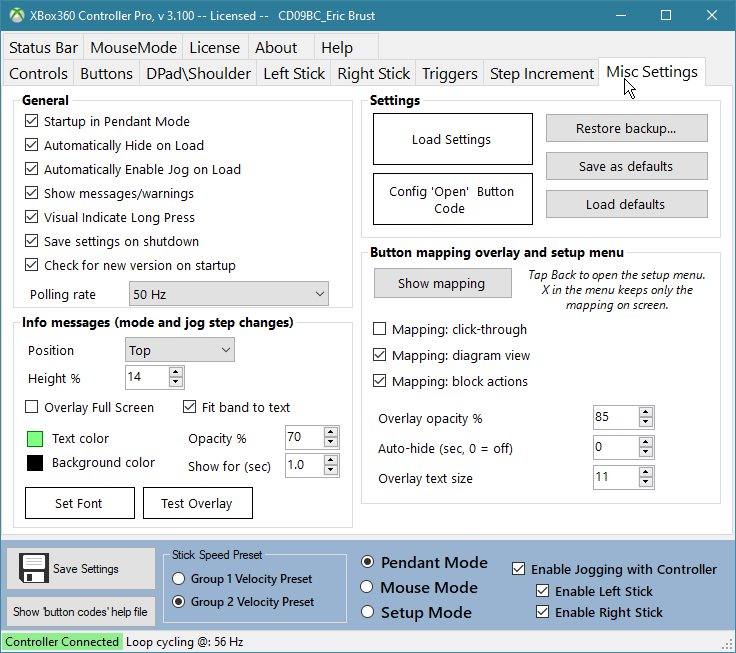
The tab is arranged in four groups: General, Info messages, Settings and Button mapping overlay and setup menu.
| Setting | Effect |
|---|---|
| Startup in Pendant Mode | Forces pendant mode at startup. |
| Automatically Hide on Load | Starts with the plugin window hidden in the notification area. Combined with the setting below, you never need to see the window again once it is set up. |
| Automatically Enable Jog on Load | Tries to switch jogging on when the plugin loads. This does nothing if no controller is found. |
| Show messages/warnings | Untick to suppress the plugin’s pop-up warnings. |
| Visual Indicate Long Press | Shows a countdown overlay while a button is held towards a long press (section 8.2). |
| Save settings on shutdown | Saves the settings automatically when the plugin closes. |
| Check for new version on startup | Looks online for a newer release each time the plugin starts, in the background, and tells you only if there is one (section 3.5). |
| Polling rate | How often the controller is read and the jog commands are sent. UCCNC loop (25 Hz), the default, uses UCCNC’s own timer. 50 Hz and 100 Hz use a timer of the plugin’s own, which can run faster and more steadily. The status bar shows the rate that is being reached (section 3.4). |
Short messages (mode changes, jog step size changes) appear in a large on-screen message. The group sets how it looks:
| Setting | Effect |
|---|---|
| Position | Top, middle or bottom of the screen. |
| Height % | How tall the message band is, as a percentage of the screen height. |
| Overlay Full Screen | Fills the whole screen. |
| Fit band to text | Makes the band only as wide and tall as the text instead of the full width of the screen. |
| Text color, Background color | Click a colour swatch to choose. |
| Opacity % | How solid the message is. |
| Show for (sec) | How long the message stays on screen. |
| Set Font | Chooses the font. This is the largest size the text will use. |
| Test Overlay | Shows a sample message so you can check your choices. |
The text always shrinks to fit inside the band, however long the message or large the font, so none of it is cut off. The message never takes the keyboard focus from UCCNC.
| Button | What it does |
|---|---|
| Load Settings | Reloads the saved settings file. |
| Config ‘Open’ Button Code | Sets a UCCNC button number that opens/shows the plugin. Assign that number to your own screen button or a UCCNC hot key. |
| Restore backup… | Puts back an earlier saved copy of the settings. A backup is made automatically whenever the settings change. |
| Save as defaults | Uses the settings on screen as the starting values for new profiles or a new install (the license name and key are left out). |
| Load defaults | Replaces the settings on screen with the saved defaults. Press Save Settings afterwards to keep them. |
The Save Settings button is at the bottom left of the window and saves the current settings for the active UCCNC profile.
| Setting | Effect |
|---|---|
| Show mapping | Shows or hides the overlay so you can place it. Drag it where you want it; double-click it to close it. |
| Mapping: click-through | The overlay ignores the mouse, so UCCNC can be used right through it. Untick to be able to drag it. |
| Mapping: diagram view | Draws the mapping on a picture of the controller instead of as a list (section 10.2). |
| Mapping: block actions | While the overlay is shown, the controller does nothing in UCCNC (section 10.5). |
| Overlay opacity % | How solid the overlay is, 20 to 100%. The setup menu uses the same setting. |
| Auto-hide (sec, 0 = off) | Hides an overlay that was switched on with the toggle button after this many seconds. Zero leaves it up until you toggle it off. |
| Overlay text size | Text size of the overlay, in points. The controller drawing scales with it. |
Settings are stored in plugins\XBoxControllerPro\Settings\ inside your UCCNC folder, as one file per UCCNC profile, so
different machines or profiles can have different controller setups. The plugin:
Defaults sub-folder;To copy your setup to another PC, copy the contents of the XBoxControllerPro folder.
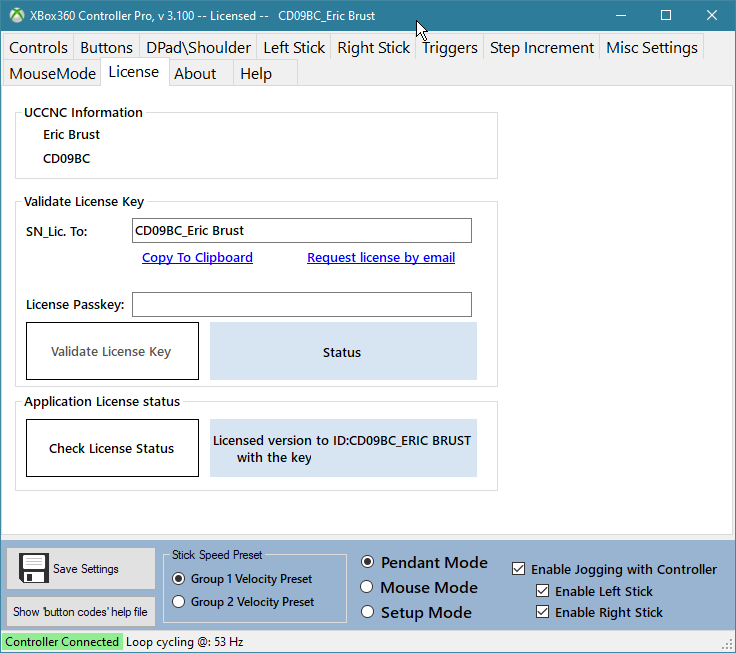
The plugin can be tried for 45 days with every feature working. The window title shows the number of days remaining. When the trial ends the plugin stops responding to the controller until it is licensed.
XBoxcontrollerPro.dll must be in the plugins folder of your UCCNC installation (see section 2).The plugin reads the controller through XInput, which is how Windows talks to genuine XBox 360 and XBox One controllers and to compatible clones. Many third-party “XBox-style” pads have a second mode, DirectInput, in which Windows lists them as a generic Gamepad or USB Joystick. XInput cannot see a pad in that mode, so the plugin cannot either — whatever software is installed. When this happens the plugin tells you: the status at the bottom of the window reads Gamepad found, not in XInput mode (hover over it for the fix), the status bar shows NO XINPUT PAD, and the overlay’s status line says PAD NOT IN XINPUT MODE.
Raise that stick direction’s deadband (section 5.3).
Choose the Rev_ version of the axis for that stick direction.
A button that starts a jog on Press needs the matching stop function on Release (section 8.1).
Make sure the old xboxcontroller.xml (and any xboxcontroller_PROFILENAME.xml) files are still in the
plugins folder the first time version 3.100 runs, then press Save Settings.
Mapping Overlay (hold) is in the button’s On Press box (or (toggle) in any box), and that you are in
pendant mode. In mouse and setup mode only the Start button’s boxes are active.Mapping: block actions on the Misc Settings tab is ticked. The status line shows PAD ACTIONS BLOCKED in orange. Untick the option if you want the controller to keep working with the overlay up (section 10.5).
The PC is offline, or the website could not be reached. Nothing is wrong with the plugin; try again later with the Check for new version button on the About tab.
| Control | Pendant mode | Setup menu | Mouse mode |
|---|---|---|---|
| Left stick | Jog (assigned axes) | — | Move pointer |
| Right stick | Jog, or jog step size | — | Scroll |
| Triggers | Jog safety or speed boost | — | Left trigger: faster pointer |
| A | Assigned button functions | Switch the stick speed set | Left click |
| B, Y | Assigned button functions | Close the menu | B right click, Y Esc |
| X | Assigned button functions | Display only (keep the overlay, leave the menu) | Enter |
| D-pad | Step jog, or assigned functions | Up/down: select a row. Left/right: change its value | Arrow keys |
| LB / RB | Step jog, or assigned functions | Change a velocity in big steps | Shift+Tab / Tab |
| Stick clicks | Assigned functions, stick speed or stick on/off | — | Right stick click: Space |
| Start | Assigned function, or Show/Hide Plugin | Same | Same |
| Back | Short: setup menu. Hold: mouse mode | Short: back to pendant | Hold: back to pendant |
| Path (inside the UCCNC folder) | Purpose |
|---|---|
plugins\XBoxcontrollerPro.dll | The plugin |
plugins\XBoxControllerPro\Settings\ | Settings, one file per UCCNC profile, plus backups and log |
plugins\XBoxControllerPro\Settings\Defaults\ | Saved defaults |
plugins\XBoxControllerPro\Manual\ | This manual (opened by the Help tab) |
plugins\xboxcontroller*.xml | Settings from version 3.000 and earlier, read once and never changed |
Compared with version 3.000:
plugins\XBoxControllerPro\Settings\ with safe saves, rotating backups and a load log, and new
Restore backup, Save as defaults and Load defaults buttons.The full change history, including earlier versions, is in the README - xbox360 notes.txt file supplied with the plugin.